There are often times when subjects require corrective lenses in order to properly perform tasks while inside the MRI machine. We purchased a pair of MRI-safe goggles with interchangeable lenses some years back (see Note #1) and using them with our 12 channel head coil is easy because the inner diameter of the coil is large enough to comfortably fit the subject, a support pillow, and the goggles without any issue.
 |
| Figure 1 - MRI-safe goggles with prescription lenses |
Using them with the 32 channel head coil however, is considerably more difficult to do. It is already hard enough to fit a subject comfortably inside the coil with support padding, so attempting to include the goggles as well is simply not an option. To solve this problem we designed and machined lens holders (Figures 2 and 3) that fit inside the eye sockets of the 32 channel coil. They're easy to set up and the fit is snug so that they don't move. Sometimes we use a velcro strap to keep them together but it's not required.
 |
| Figure 2 - 32 ch coil lens holder with velcro strap |
 |
| Figure 3 - lens holders inserted into coil eye sockets |
Problem solved, right? Ah but what if these holders break? What if other researchers have this same issue but don't have a mechanical engineer on staff who can design and machine pieces like these? The best solution to both of these scenarios (and many more!) is to create 3D CAD models and make them available for anyone to download. So let's get started!
Recreating Parts in Tinkercad and Blender
Tinkercad is a free, easy-to-use 3D CAD design tool that works in your browser and uses Boolean addition and subtraction of simple shapes to allow the creation of more elaborate models. I have to be honest, I am more comfortable with
Blender, which is also free, but Tinkercad is far easier to pick up and ideal for (relatively) simple designs like these holders. I had zero experience with Tinkercad beforehand but doing their tutorials for about an hour familiarized me enough with their UI to complete the project. Using calipers to get as accurate as possible, I measured the various dimensions of one of the holders and after a few hours I came up with the following design:
 |
| Figure 4 - Lens holder in Tinkercad |
Not too shabby, right? I know it's hard to get a sense for 3D models in pictures but hopefully you can make out some details. If not, no need to worry. I'll provide a link later on so you can download the model yourself and take a closer look. The next step is to export the model to Blender and bevel some edges to make for a smoother fit inside the eye socket. Beveling is not an option in Tinkercad (See Note #2) so importing the STL file to Blender is the easiest way to finish it up.
 |
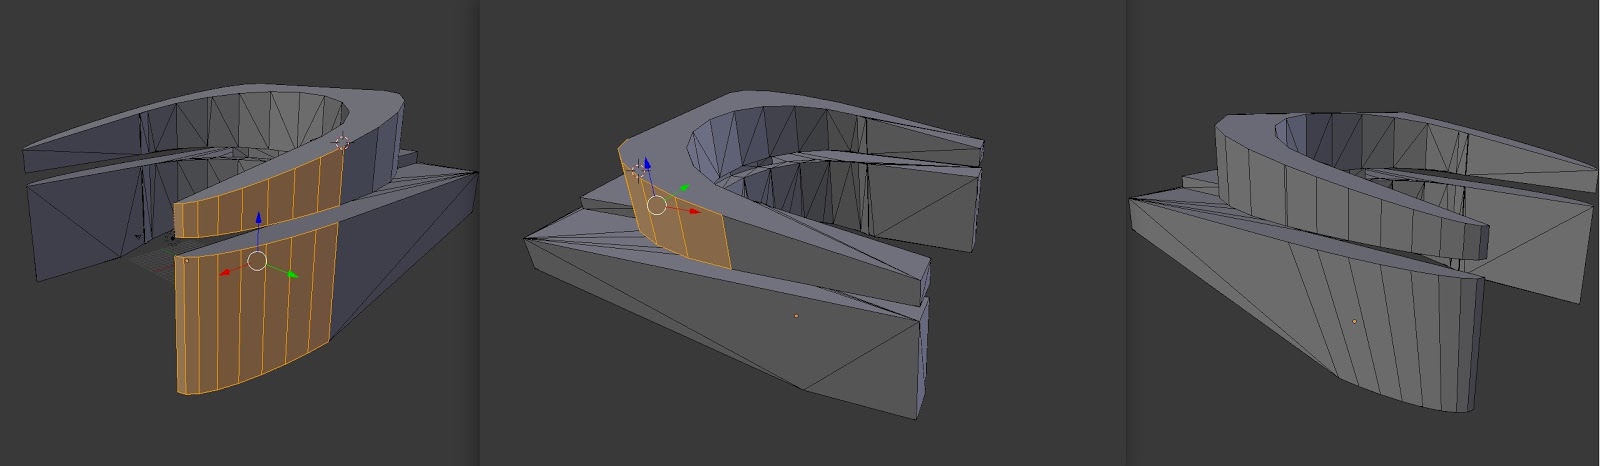
| Figure 5 - Beveling in Blender |
After beveling, the final step in this section is to duplicate the part and mirror it about the X axis to create the second holder.
 |
| Figure 6 - Duplicating and mirroring in Blender |
The hardest part of this project is done, though we can always make changes should the need arise (See Note #3). Now it's time to manufacture the pieces.
3D printing the Holders
It's possible to take drawings to a machinist and have them create the parts out of nylon or some other plastic but if you've got a 3D printer handy than the best/easiest solution is to print them out yourself in just a few hours. I even printed a few versions using different material to see which one suited our needs best.
 |
| Figure 7 - Holders printed using PLA |
 |
| Figure 8 - Holders printed using PETG |
 |
| Figure 9 - Holders printed using NylonX |
Although it may look like all I did was print the same thing in three different colors, there's more than meets the eye! Figures 7, 8 and 9 are images of completed lens holders printed using
PLA,
PETG and
NylonX, respectively (See Note #4). Printing the pieces in NylonX was the best solution because of its durability and flexibility, allowing for the holders to be crammed into the eye sockets and thicker lenses to be placed inside them without fear of breakage. Below are images of a thin lens and a thick lens held securely inside the holders (See Note #5).
 |
| Figure 10 - Top view of lens in NylonX holders |
 |
| Figure 11 - Side view of lens with different thicknesses |
There you have it! Hopefully these designs are a help to other research groups looking to use corrective lenses alongside their 32 channel coil. Here's the link to the original
Tinkercad design for those that are interested, but be aware that the design would still need to be beveled, duplicated and mirrored before it's ready. This
Dropbox link contains the Blender file with the two finished pieces as well as stl files for each individual piece. I would suggest bookmarking the link since I plan on adding the designs for our mirror holders soon. So be on the lookout for those blog posts in the future as well!
Notes
#1 The merchant we purchased the interchangeable MRI-safe goggles from has since gone out of business, but a quick Google search returns other vendors with similar
products.
#2 Technically you CAN create a beveling effect using some tricks but it is far more trouble than it's worth.
#3 It's easy enough to go back and alter the dimensions of the piece if need be -- that's what I did! The design was revised several times before I found the best fit. You may have to do this as well depending on the shape of the lenses you are using, just make sure you edit the areas that hold the lens and not the ones that secure the holder to the eye socket.
#4 The only 3D printer setting worth changing from whatever default you have is upping the infill to 100%. As with any print that gets handled quite often, you'll want them to be dense and sturdy so it can take a bit of abuse.
#5 If you're still having trouble with fitting thicker lenses then increase the height of the small square in the middle of the Tinkercad piece by a few millimeters until you find a value that works